As someone who loves the outdoors, I know how important it is to have the right skills. Building a semi-permanent structure with natural materials is a key skill.
A DIY Wickiup Shelter is a great choice for staying safe and dry. In this article, I’ll show you how to build one.
Learning to build a Wickiup will not only teach you a new skill. It will also make your outdoor adventures better. I’ll give you clear instructions to start building.
Key Takeaways
Understand the concept of a Wickiup Shelter and its significance in outdoor survival.
Learn the basic materials needed to build a DIY Wickiup Shelter.
Follow step-by-step instructions to build your own Wickiup Shelter.
Discover the benefits of having a semi-permanent structure in the wilderness.
Enhance your outdoor experience with this valuable survival skill.
What is a Wickiup Shelter?
Wickiup huts are fascinating for those who love traditional building. They are dome-shaped and made from saplings. They are linked to Native American building methods.
Many cultures have used wickiup shelters. They are practical and versatile. We will look at what they are, their history, and how they are used.
Definition and Purpose
A wickiup is a dome-shaped shelter. It’s made from bent saplings and covered with grasses, leaves, or animal hides. It’s meant for semi-permanent shelter in the wild or temporary settlements.
Wickiups can handle different weather. They are simple yet effective. This makes them popular among outdoor lovers and those interested in traditional building.
Historical Context
Wickiup shelters have a long history, mainly with Native American communities. They were homes, used when tribes moved with the seasons.
Each Native American tribe built wickiups differently. They used what was available locally. This shows their creativity and resourcefulness.
Common Uses
Today, wickiup shelters serve many purposes:
Camping and outdoor adventures
Temporary housing in wilderness areas
Educational purposes, teaching traditional building techniques
Cultural events and historical reenactments
Wickiup shelters are versatile and valuable. They are important in teaching and for cultural events. Their lasting use shows their significance in traditional building.
Materials Needed for Building a Wickiup
To build a strong wickiup, you need the right natural materials and tools. Choosing the right materials is key for a durable and useful shelter.
Natural Materials
The main materials for a wickiup are found in nature. Saplings and branches are vital for the frame. Find straight, strong branches to shape the dome of the shelter. Leaves and grasses are used for thatching, keeping you warm and dry.
Here’s what to look for in natural materials:
Straight, sturdy saplings for the frame
Flexible branches for bending into the dome shape
Dry leaves and grasses for thatching
Vines or cordage for tying the structure together
Tools Required
While you find many materials in nature, some tools are needed. A sharp knife is essential for cutting and shaping branches. Cordage or twine is used to tie the frame, keeping it stable.
Other important tools are:
A knife or machete for cutting and shaping materials
Cordage or twine for securing the structure
Optional Supplies
You might want extra supplies to make your wickiup better. Waterproofing materials like tarps or plastic sheets help against rain and wind. Bedding materials like pine needles or dry leaves make it more comfortable.
“The key to a successful wickiup shelter is not just in the materials, but in how they are used to create a safe and comfortable space.”
Here are some optional supplies to think about:
Waterproofing materials (tarps, plastic sheets)
Bedding materials (pine needles, dry leaves)
Additional insulation (blankets, sleeping bags)
Choosing the Right Location for Your Wickiup
Choosing the right spot for your wickiup is as important as the structure itself. A good location offers natural protection, easy access to resources, and a cozy living space.
Start by looking at several key factors. These include the terrain, wind direction, water sources, and building materials.
Factors to Consider
When picking a spot, check if the terrain is right for your wickiup. It should be flat and dry for a solid base.
Find a place with good drainage to avoid water problems.
Look for natural shelter from trees or rocks.
Position your wickiup to avoid harsh winds.
Assessing Terrain
The terrain greatly affects your location choice. A flat area is best for easy construction and a stable base.
Terrain Type
Advantages
Disadvantages
Flat Ground
Easy to construct, stable foundation
May lack natural shelter
Hilly or Rocky
Natural shelter, scenic views
Difficult to construct, uneven ground
Low-Lying Areas
Accessible to water sources
Prone to flooding, damp conditions
Proximity to Resources
Being near water, food, and building materials makes your wickiup better. But, safety is also key.
Think about the following when choosing a location:
How far is the nearest water source?
Is there food nearby, like foraging or hunting spots?
Can you easily get materials for your wickiup?
By considering these points, you can find a great spot for your Wickiup Shelter Design. It will be a solid Outdoor Shelter Construction and a reliable Survival Shelter.
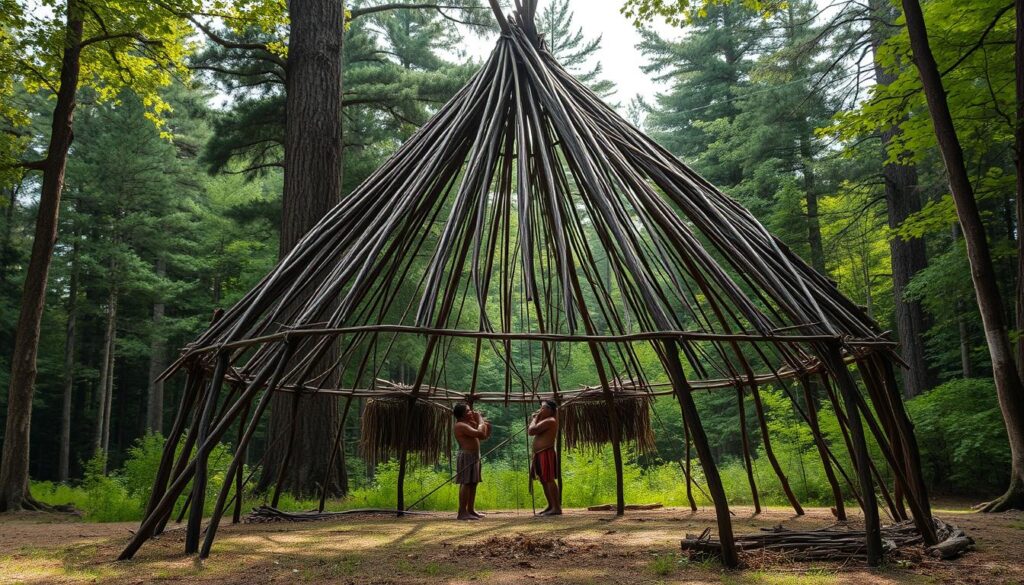
Step-by-Step Guide to Constructing a Wickiup
In this section, I’ll guide you through building a wickiup shelter step by step. Building a wickiup is a fun DIY project. It needs basic materials and some know-how.
Starting with the Frame
The first step is to prepare the frame. You’ll need to gather saplings and bend them into a dome shape. The frame is key, giving your wickiup the strength it needs.
To create the frame, follow these steps:
Select sturdy, flexible saplings that can be bent into a dome shape.
Clear the area of any debris and mark out a circle to define the perimeter of your wickiup.
Place the saplings around the perimeter, bending them towards the center and securing them with a tie or cord.
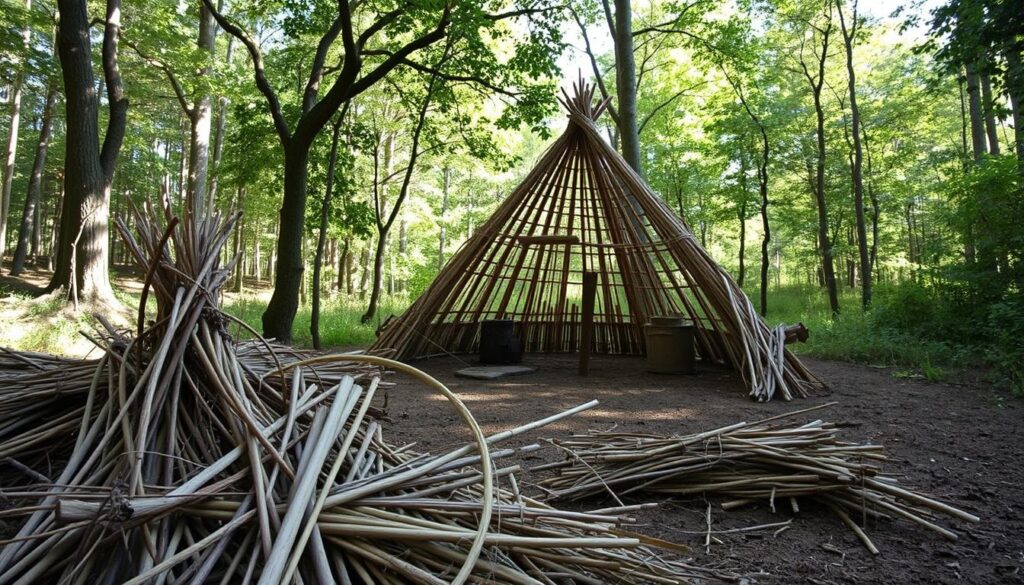
Adding the Walls
Once the frame is set, you can start adding the walls. You’ll weave saplings or branches between the frame members. This makes the structure solid and protects from the elements.
To add the walls, follow these steps:
Weave smaller branches between the frame members, overlapping them to create a solid barrier.
Continue adding layers of material until the walls are the desired thickness.
As John Smith, an outdoor enthusiast, once said, “The key to a successful wickiup is in the details – from the sturdiness of the frame to the thickness of the walls.” This shows how important careful construction is.
Creating the Roof
The last step is creating the roof. It should be waterproof and durable, able to handle different weather. You can use natural materials like leaves, grasses, or bark to cover the frame.
Material
Description
Water Resistance
Leaves
Abundant and easy to gather
Moderate
Grasses
Flexible and durable
High
Bark
Water-resistant and sturdy
Very High
By following these steps and using the right materials, you can build a sturdy and cozy wickiup shelter. Remember to pick materials that are weather-resistant and durable.
Insulating Your Wickiup Shelter
Insulation is key in wickiup shelter building, keeping you warm and cozy. A well-insulated shelter guards against harsh weather. This makes it a vital part of Outdoor Shelter Construction.
Natural Insulation Types
Nature offers many materials for insulating your wickiup. Leaves, grasses, and pine boughs are great insulators. For example, a thick layer of leaves can block cold and keep warmth in.
As I always say, “A successful wickiup shelter blends into its surroundings and offers comfort.” Using natural materials not only insulates but also helps the shelter blend in.
Some effective natural insulation materials include:
Dry leaves
Grasses
Pine boughs
Animal hides
Thick branches
Weather Considerations
Weather affects the insulation you should use. In cold climates, use thicker materials like pine boughs. In milder weather, leaves or grasses are enough. Always check the weather and plan your insulation.
“The preparation for survival is a preparation for life.”
Enhancements for Comfort
There are ways to make your wickiup shelter more comfortable. Adding a bed of leaves or grasses inside helps a lot. Also, make sure your shelter has good ventilation to avoid moisture buildup.
To boost comfort, consider:
Using soft, dry bedding materials
Ensuring proper ventilation
Adding layers of insulation based on weather conditions
Staying Safe in Your Wickiup
To enjoy your wickiup, knowing and using safety steps is important. Wickiups face unique challenges and dangers.
Fire Safety Guidelines
Fire is a big risk in any shelter, like a wickiup. To stay safe, follow basic fire safety rules. Make sure your wickiup is far from flammable things or branches.
Keep a fire extinguisher or a bucket of sand nearby.
Never leave a fire unattended.
Make sure the fire is completely extinguished before leaving it.
Using a fire pit or ring helps keep the fire in one place. Also, check local fire rules before lighting a fire.
Wildlife Precautions
Living in a wickiup means you might see wildlife. To avoid problems, take these steps:
Precaution
Description
Store food and trash properly
Keep food and trash in sealed containers and away from your wickiup to avoid attracting wildlife.
Be aware of your surroundings
Regularly check your surroundings for signs of wildlife, such as tracks or scat.
Make noise while moving around
Make noise to avoid startling animals, which is important in dense areas.
Emergency Exits and Accessibility
It’s key to have clear emergency exits and easy access in your wickiup. This means:
Having at least two exits.
Keeping the exits clear of obstructions.
Ensuring that the shelter is accessible for all occupants, including those with disabilities.
By following these tips, you can make your wickiup safer and more enjoyable.
Enhancing Your Wickiup Experience
Improving your wickiup experience is more than building it. It’s about making it cozy and welcoming. You can make your shelter special with a few enhancements.
Decoration Ideas
Decorating your wickiup is a great way to make it your own. Use natural items like pinecones, leaves, or feathers for a unique look. Add warmth and character with blankets or woven baskets.
Here are some ideas to get you started:
Make a centerpiece with natural elements
Hang wind chimes or decorations from the roof
Add colorful fabrics for visual interest
Creating a Comfortable Interior
Comfort is essential in your wickiup. Make sure you have good bedding and layers for cold nights. Soft lighting, like candles or a lantern, can also improve the ambiance.
Here’s how to make your interior cozy:
Element
Description
Benefit
Bedding
Use thick blankets or a sleeping bag
Warmth and comfort
Lighting
Candles or small lanterns
Ambiance and visibility
Seating
Comfortable seating or mats
Relaxation and socializing
Adding Amenities
Adding amenities can make your wickiup even better. Consider a cooking area, storage, or a workspace. These can improve your life in the shelter.
By adding thoughtful touches, you can make your wickiup a place you love. It can be a temporary home or a permanent one. These enhancements will greatly improve your experience.
Maintenance Tips for Your Wickiup
Keeping your wickiup shelter in good shape is important. It makes sure your shelter is safe and comfy. Regular care also makes your outdoor adventures better.
Seasonal Upkeep
Seasons change, and so does your wickiup shelter. It’s key to do upkeep tasks for each season. Check for damage, clean out debris, and keep it dry.
Spring and Summer: In these months, clean out winter debris. Look for damage and fix it if needed.
Autumn and Winter: Make your wickiup cozy for cold weather. Add insulation and strengthen it against snow and wind.
Repairing Damage
Even with care, damage can happen. Fixing it fast is important to avoid more problems. You might need to fix branches, re-secure the structure, or patch holes.
“A stitch in time saves nine.” This saying is true for your wickiup shelter. Fixing small issues early saves time and effort later.
Long-Term Considerations
If you plan to use your wickiup for a long time, think about a few things. Keep it strong, protect it from pests, and upgrade as needed.
By following these tips, your wickiup shelter will last for many years. Regular care is essential for a long-lasting and safe outdoor shelter.
Wickiup Shelter Variations
Wickiup shelters have evolved into many designs, meeting different needs. Their history shows how adaptable and creative people can be.
These shelters have changed a lot over time. Traditional designs use natural materials and old techniques. On the other hand, modern designs use new materials and methods for better durability and comfort.
Traditional vs. Modern Designs
Traditional wickiups use branches, leaves, and mud. Modern ones might use tarps and ropes for better weather protection and easier building.
Regional Differences
Where you build a wickiup matters a lot. For example, in snowy areas, roofs are steeper to let snow slide off. In hot places, they focus on shade and keeping cool.
Region
Design Adaptation
Primary Material
Desert
Shade emphasis
Brush, leaves
Mountainous
Snow runoff design
Wood, snow
Forest
Insulation focus
Branches, mud
Use in Various Seasons
Wickiups can be changed for different seasons. Adding insulation and strengthening the structure makes them good for winter.
In summary, wickiup designs mix old wisdom with new ideas. This makes them useful in many places and times.
Final Thoughts on Building a Wickiup
Building a wickiup shelter is a rewarding experience. It connects you with nature and tests your outdoor skills. Through my journey, I learned the importance of selecting the right site and using minimal gear. I also learned to appreciate the simplicity of Outdoor Shelter Construction.
Lessons Learned
Reflecting on my experience, I realized the key to a successful wickiup is its simplicity. Building a wickiup using natural materials found in the forest was fun and educational. For more details, you can visit this resource that shares a similar experience.
Key Takeaways and Next Steps
The main takeaways from building my wickiup shelter include teamwork, site selection, and minimal yet effective gear. If you’re thinking of building your own wickiup, start by learning the basics of Outdoor Shelter Construction. Then, experiment with your own DIY Wickiup Shelter.
FAQ
What is a wickiup shelter?
A wickiup shelter is a traditional Native American home made from natural stuff like branches and leaves. It’s simple but effective for keeping out the weather.
What materials are needed to build a wickiup shelter?
You’ll need things like saplings, branches, and mud to build a wickiup. You’ll also need a knife or saw to cut and shape the materials.
How do I choose the right location for my wickiup shelter?
Pick a spot that’s flat, dry, and protected from wind and rain. It should also be close to water and other resources.
How do I insulate my wickiup shelter?
Use leaves, grasses, or pine needles to keep your shelter warm. How much you use depends on the weather.
What safety precautions should I take when living in a wickiup shelter?
Always follow fire safety rules and watch out for wildlife. Make sure you have a way out and the shelter is easy to get to.
Can I build a wickiup shelter in different seasons?
Yes, you can make a wickiup shelter for any season. Just change the design and materials to fit the weather.
How do I maintain my wickiup shelter?
Keep your shelter in good shape by doing upkeep and repairs. Think about how to make it last longer over time.
What are some variations of wickiup shelters?
Wickiup shelters can look different, from old-fashioned to new. They can also change based on where you are and what materials you have.
What are the benefits of building a wickiup shelter?
Making a wickiup shelter is a great way to learn about building and surviving outdoors. It teaches you about being self-sufficient.
Is building a wickiup shelter a difficult task?
Building a wickiup shelter takes some work and skill. But with the right help and materials, it’s something anyone can do.